

while i'm just sitting there with my sukhoi n long ez, there are still friends who bold enough to fly their craft in that windy condition. one of them fly his diy foam zagi fying wing. which reminds me of my late corozagi. i've had build two coro zagi last time, build new one after i trash the first one. and the second one i've gave it to a friend after i think i'm not into it. but now the urge to fly zagi again has revisited me. and i got some ideas for my third coro zagi, and would like to share it here ( i know you guys must be thinking "this guy still hasnt successfully fly his sukhoi, and yet already come with a new project". well guys, thats the love for the game - scratch build. as for the sukhoi i'll try and keep trying to fly it. reschedule after chinese new year).
My CoroZagi V2 here
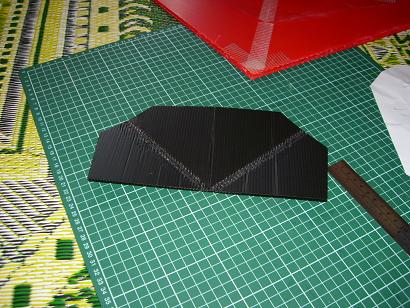
this is my late corozagi


as for my ideas for my new corozagi, im thinking of:
1. using the same measurement as my late corozagi.
2. instead of sandwiching the wing with a coro spar inside for the airfoil, im going to use kfm2. i could find a lot of its application to scratchbuild rc plane and would give it a try. as its simple and could save weight.

3. planning on using depron for the elevons. again to cut weight.
4. would like to try a mid mounted motor. as from what i see, this configuration can some how bring most of my hardwares to the center of the wing, instead of putting the battery way up front to get the cg and damaging it on head on crash. with the batery way back, i'll get some crash zone up front which could save the battery on impact.
5. thinking of making my winglet bigger or longer with more surface area. as for my late two coro zagi, i kinda realize that its not so stable on yaw axis. so it wont hurt to give it a try.
6. like my late corozagi, i'll try to build the wing without any carbon rod wing spar. dont know weather its a good idea. just wanna give it a try.
i've already got the coro and will start putting it all togather as soon as i can, so that i can share it with u guys sooner. might get some thing going to night.
for your information, i'll keep posting the update in this same post (which i did the same as my other post like 'memories rebuild' and 'su-37'). as i dont wanna my blog flooded with too many post which discussing the same topic. pls come again. thanx guys. - kaysee out!!
update 1/22/09 :
started my new project. i decided to used my late corowing tamplate for making the wing of my corozagi. im using a 3mm 30"x20" coroplast for this build (rm7.80 frm carefour), which from my calculation will be sufficient for this project. otherwise i still have some scrap coro for later use.
using a pin, i marked the end of each line and connect it later ready for cutting.

wing finished

kfm doublers

elevons (depron) and winglet

wing taped togather : i used fibertape for this job for more strength, can use packing tape as well i think. i taped the wing togather both side.

wing taped for strength : i taped wing this way for added strength. learned it frm some zagi manual that i found on the net.

kfm doubler glued : decided to use ca for this job. works on my previous coro build. spread beats of ca. i sand the surface first to remove any wax or oil.

tracing for motor mount : im planning on using a 6" prop, but will make a space for 7" as well. who knows.

mid motor mount cutted

fitting motor mount

mounting glued : im using hot glue to fit the stick mounting. i think i'll use cableties to enfoce it later on. the stick mount i got from an old rm10 dinner plate rack. as you can see in the picture. i already fit the elevons to it place.

later im thingking of making a doubler for the nose as my late corowing.
k guys thanx for stoping by. will find some time later tonite for more updates.
update 1/23/09 :
got some time to finished my corozagi last nite. simple build, just for experimental purpose. just wanna see if my kfm2 without no spars would fly well as my late corowing. here is the progress until finished :
doubler for the nose. im using a scrap black coro to give my corozagi some contras, same as the winglets. what i do, i trace the nose shape onto the scrap coro then made some extention to the dimension of the doubler to get something like this. original idea i got it from mugi's plan. it works for my corowing. i just made a little mod for this corozagi. instead of glue the doubler both to the upper part and bottom of the nose, i decided to glue just the bottom so i can use the upper part as a canopy. you'll see what i mean from the pictures below. i glued it using ca and hot glue.


electronics pre fitting to check for cog. i used clear tape to hold all the parts down.

i made a tamplate out of a cardboard to make a holes for servos.


as for the control horns, i fabricate from thin pvc and fix it with hot glue to the elevons.

finished. all part in place. i fix the winglet using cableties and hot glued. i route my antenna along the le of the wing all the way to the winglet. the velcro strap as a battery holder. other component fix using cableties and hotglue.


this is how its look like after fitting the battery. see how the battery placed way back and the nose doubler covering it. i hope that would minimize damage cause of head on emergency landing (ie crash).

view from the underbelly. pls dont comment on the yellow thingy. see the extra space for prop clearance. i cut it to fit 7" prop. might try a 2000kv motor with 7" prop.

here is the finish setup which im using what i already have :
elevons servos - 2x tp 9g
rx - dynam 5ch 40MHz
tx - Futaba 7 CAP 40MHz
motor - APEX 450 2500kv brushless with APC 6x4 (22A, 220W WOT +/- 750 thrust)
esc - SuperSimple esc 30A
battery - 11.1V 1550mAh 20A
AUW - 500g
span - 34"
as for the maiden flight:
i have to admit that by not using any spar for the wing, my corozagi will bend on flight. that's as a first impression when i hold each tip of the wing and i can see it bend. that i have to expect on its maiden flight. i just wanna give it a try. who knows it wont be so bad at all. if it is. then i'll put a carbon tube spar for the wing.
i never fly/build a kfm airfoiled plane before. so i cant expect anything from it. i just wanna to give it a try, to see if this airfoil works for my corozagi. if it does, i might try other kfm configuration for knowledge. i could find many application of this airfoil in scratchbuilding in the net. if you interested, try search for kfm-kline fogleman.
i want to know if there's any difference in flight for mid motor setup on this type of plane. in term of controls.
so guys. wish me luck for the maiden flight. and if its succesful, then i'll share the plan here for those who interested to give it a try.
update :
manage to find time to make a short test flight at a football field behind my house. as expected, the wing flutter, just on half throttle. but it flies. even crash couple of times dodging trees (nose first - got to work on cog). and the nose doubler did it job well. no visible damage to the nose. will do some more test once i fix a spar for the wing. so the spar thing is concluded - needed badly. over all concept is proven to be working.
update 1/28/09:
yesterday i got a chance to spend 20min at the au2 field for flight test. forgot to bring along my camera to record the flight test. will do next time i got the chance.
i've fixed a carbon rod spar this time. my corozagi flies better with one. just flying in circle with no fancy moves just to find a proper cog, d/r and expo for smooth control. in doing so, i've notice that i've to make some improvement to the mounting method of winglets that i used. cableties and hotglue alone cant do the job. maybe some bamboo skewer/ lidi satay will do the job. so back to the work shop.
one more thing that i've noticed, i had made a mistake on measuring the kfm2 doubler. i you notice, its smaller than it should be. my doubler should be 50% steps measuring from leading edge to trailing edge of elevons. instead i've made the measurement without including the elevon. to make it worst, instead of 50% percent step, i've made it 40%. my bad for mistaking it with kfm1. i'll fix it once i get to make it fly batter.
update 2/1/09 :
today got a chance to record videos of my corozagi flying. will try posting it asap. thanx for folowing this post. feel free to leave comment as u wish.
update 2/4/09 :
i think its time to conclude my experiment on my corozagi. this time have to admit that the idea to use mid mounted motor comes from somewhere else besides profile park jet. actually its from SLiZE Combat Wing as its creator called it. Designed by Mr Ali. Slick clean cut design. You'll only see the motor out of all electronic needed.
From what i realise, by using mid mounted motor and elevons extended all the way back off the motor do have its own most noticeable pros.
- you'll have more control in slow flight. i can do some called high alpha, some called cobra maneuver with my corozagi.
As for my corozagi, i've made the winglet bigger compared to my late corowing. and i can spot the difference.
- more stable to on the yaw axis. that prove what i suspected with my late corowing problem.
Im using kfm2 airfoil for my corozagi. although i've made mistake on applying this airfoil, i can see it still helps. my corozagi flew just like wing with airfoil. this kfm thing really a good trick for any scratcbuild coro/depron design.
i think i'll go for the next step on this experiment. with the same platform:
- im going to redesign my corozagi to overcome my flutter problem.
- wanna try kfm4 this time for it speed friendly (i'll make sure i do it right this time).
- trying to hide all the electronics inside the wing.
so guys. come back for progress of my corozagi V2. as for the first prototype, i'll try to post the plan here asap for those interested to give it a try.
relax ur eyes after reading my bad english with this two related vids.
update 2/5/09:
i hope this would help for those who would like to give it a try.


you can combine it togather as master template. what i do, i draw all nessesary lines on one 11" x 22" cardboard, then tranfered the dimensions using a pin. just put the template on ur 11" x 22" coro, then poke holes on the lines and cut ur coro by connecting the holes. like those connecting dots to see the picture game in news paper. get the picture? i forgot to mention the cog. start with 8" from nose tip and work your way back. hope it helps.
please share if you build one.
EDITED :
as for the nose doubler, just simply use a piece of paper to trace out the nose part where u wanna put the double and transfer it to coro. its optional.
update 2/10/09:
working on corozagi V2. will put it in new post as im thingking this corozagi prototype is concluded.
Coro Zagi V2 here
No comments :
Post a Comment
pls leave your email or other means of contact info.